In our remote world, video production has shifted from to Zoom.
With social distancing rules still in place, anyone who wants video content needs to get creative in order to produce video remotely. Luckily, capturing quality video is still attainable to anyone willing to give DIY video a try.
1. Use the tools you already have
Chances are the mini supercomputer in your pocket is capable of capturing quality video content. If you have a smartphone with a decent camera, you can shoot great video. Boom. Check that off your list. You can also step up your game by using a DSLR camera if you have access to one.
2. Get Perfect picture quality
For the most part, your smartphone camera will automatically optimize the shot to ensure a decent picture. Most modern smartphones can record up to 4K. While that’s awesome, it’s probably a higher resolution than you need. Instead, tweak the settings to shoot at 1080p HD at 30 fps (frames per second). This will preserve more memory on your phone while still getting that high-quality look.
3. Good lighting really makes a difference
Being able to control light is the key to successfully lighting your frame for filming. While we are all stuck indoors, windows will be your best friend for this. The key to quality DIY lighting is to soften and diffuse the source. Use a curtain, shades, or even a bedsheet (for real) to help diffuse bright sunlight. And believe it or not, a cloudy day is the best environment to shoot outdoors.
Whether your setup is indoors or outside, consider the following lighting tips:

*Additional 3-point lighting tips for Beginners from nofilmschool.com.
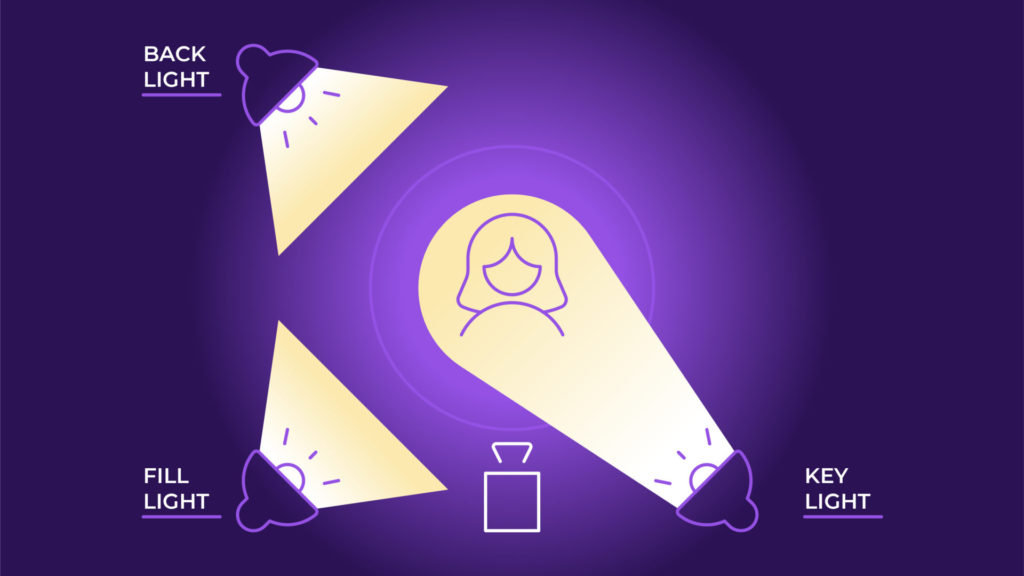
Key Light: The primary light source should face the subject at an angle and provide good coverage. If your subject is a person, half of their face closest to the light source should be well lit, the other half should have subtle shadows. A
Fill Light: The secondary light source should hit the subject from the opposite angle to the key light, however this source should be diffused and not as strong as the key. Its purpose is to fill in shadows caused by the key light without creating its own.
Back Light: The third light source should hit your subject from behind, slightly higher and at an angle. Its purpose is to contrast the subject from the background scene to give the subject greater depth. It will also caste a subtle glow around the subject which will add an extra level of polish to your shoot.
4. Shoot wide, crop later
Square and vertical video are necessary for marketing today (i.e. Instagram and TikTok), but unless you’re specifically capturing content for those formats, always shoot horizontally. Horizontal remains the dominant format across most channels, and it just takes a little planning to translate it to other formats.
When you’re planning your horizontal shoot, make sure the subject and relevant visuals fit within a perfect square so that you can crop off the sides without losing important details.
5. Quality audio makes the difference
The mic on your smartphone is not good enough to capture quality audio if the subject is speaking from more than one foot away from the camera. However, this drawback is easy to solve by having the subject wear an earbud or Bluetooth headphones that they can speak into while the camera records. This can be done directly through the phone, or if you’re recording from your computer, by pulling up a simple audio recording app and hitting record. Later during the editing processes, the audio from the recording and the video from the camera can be paired for optimal video and audio quality.
6. Uncut is good, edited is better
Your smartphone has access to an entire ecosystem of editing apps, so if you’re feeling ambitious, why not give one a try? For on-the-go editing on your mobile device, you can go simple with iMovie. For a slightly more professional tool, try Adobe Premiere or Final Cut Pro X while editing on a computer.
7. Keep it steady
Shaky video footage can be distracting to the viewer and look unprofessional (unless you’re stylizing it like a vlog or for TikTok), so keep your camera steady. Whether you’re using a smartphone or a DSLR camera, set up your shot in a stationary spot. If you have a tripod with a smartphone or camera adapter, you’re set. Otherwise, you can balance your smartphone against a few books. The key to camera placement is to be eye level—or slightly above—with your subject.
8. Setting the scene
Okay, now that’s all done: lights, camera, action… Right?
Almost! Let’s talk about the background. Your cluttered bookshelf or messy dark bedroom is not necessarily an ideal backdrop and your plain, white wall isn’t very interesting. Here are a few ways to optimize your scene:
- Tidy up furniture, papers, books, or other objects.
- Busy can be distracting so clear out elements that visually overpower your subject.
- Hang a photo or bring in a house plant to give a plain backdrop some color.
9. Create Eye-catching type and animation
Once your video is shot and cut together, simple animations can do a lot to spice up a video. Some short-form animations may sometimes even more effectively convey your message than a video. If you’re curious about the power of animation, there are several accessible tools on the market to help you get started. Canva is great for creating your own short animations using pictures and graphics, and Adobe Premiere has several graphic templates to add titles and text.
Get filming
With these tips in mind, you should be set up to start filming some quality content. If you can handle the video aspect of production, but editing seems a little daunting, Scout Digital can help!


